There are other ways to input data into your application besides using a device's keyboard. One such method is reading barcodes. In this post, I'll demonstrate how easy it is to implement a solution for this functionality.
AVCaptureMetadataOutput
AVCaptureMetadataOutput is the class responsible for intercepting metadata objects from the video stream captured during a session. Part of the AVFoundation framework, its primary purpose is to detect and process metadata in real-time while capturing video.
Key Characteristics of AVCaptureMetadataOutput:
Code Detection:
This class can detect various types of codes, such as QR codes and barcodes, including formats like EAN-8, EAN-13, UPC-E, Code39, and Code128, among others.Flexible Configuration:
You can specify the types of metadata you want to capture using themetadataObjectTypesproperty. This provides granular control over the kind of information the system processes.Delegate-Based Processing:
Metadata detection and processing are managed via a delegate object. This approach provides flexibility in handling the detected data and enables custom responses. However, note that working with this delegate often requires integration with the UIKit framework for user interface handling.Integration with AVCaptureSession:
The AVCaptureMetadataOutput instance is added as an output to an AVCaptureSession. This setup enables real-time processing of video data as it is captured.
Creating iOS App sample app
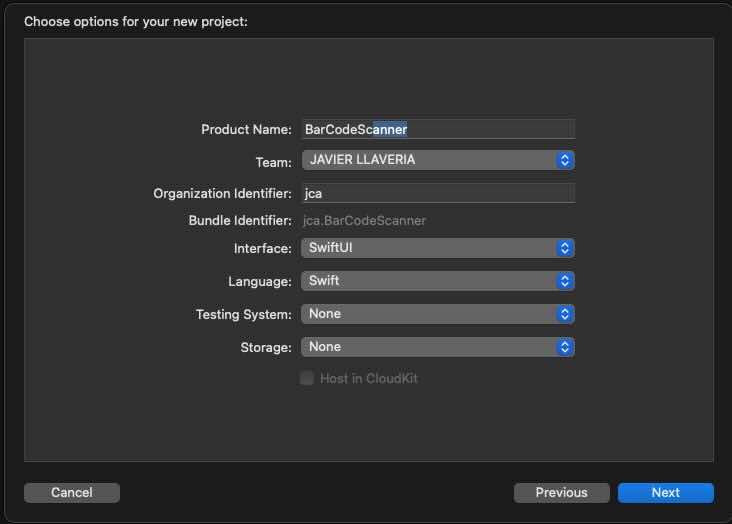
Create a new blank iOS SwiftUI APP, and do not forget set Strict Concurrency Checking to Complete and Swift Language Versionto Swift 6
As I mention on point 3 from past section, the pattern that implements AVCaptureMetadataOutput is deletage patterns, but we want our app that uses the latest and coolest SwiftUI framework. For fixing that we will need support of our old friend UIKit. Basically wrap UIKit ViewController into a UIViewControllerRespresentable, for being accessible from SwiftUI. And finally implement delegate inside UIViewControllerRespresentable.
Create a new file called ScannerPreview and start writing following code:
import SwiftUI
import AVFoundation

// 1
struct ScannerPreview: UIViewControllerRepresentable {
    @Binding var isScanning: Bool
    var didFindBarcode: (String) -> Void = { _ in }
    // 2
    func makeCoordinator() -> Coordinator {
        return Coordinator(parent: self)
    }
    // 3
    func makeUIViewController(context: Context) -> UIViewController {
        let viewController = UIViewController()
        let captureSession = AVCaptureSession()

        // Setup the camera input
        guard let videoCaptureDevice = AVCaptureDevice.default(for: .video) else { return viewController }
        let videoDeviceInput: AVCaptureDeviceInput

        do {
            videoDeviceInput = try AVCaptureDeviceInput(device: videoCaptureDevice)
        } catch {
            return viewController
        }

        if (captureSession.canAddInput(videoDeviceInput)) {
            captureSession.addInput(videoDeviceInput)
        } else {
            return viewController
        }

        // Setup the metadata output
        let metadataOutput = AVCaptureMetadataOutput()

        if (captureSession.canAddOutput(metadataOutput)) {
            captureSession.addOutput(metadataOutput)

            metadataOutput.setMetadataObjectsDelegate(context.coordinator, queue: DispatchQueue.main)
            metadataOutput.metadataObjectTypes = [.ean13, .ean8, .pdf417, .upce, .qr, .aztec] // Add other types if needed
        } else {
            return viewController
        }

        // Setup preview layer
        let previewLayer = AVCaptureVideoPreviewLayer(session: captureSession)
        previewLayer.frame = viewController.view.layer.bounds
        previewLayer.videoGravity = .resizeAspectFill
        viewController.view.layer.addSublayer(previewLayer)

        captureSession.startRunning()

        return viewController
    }

    func updateUIViewController(_ uiViewController: UIViewController, context: Context) {
        // Here we can update the UI if needed (for example, stopping the session)
    }
}
To integrate a UIViewController into a SwiftUI View, import SwiftUI (for access to UIViewControllerRepresentable) and AVFoundation (for AVCaptureMetadataOutputObjectsDelegate).
Key Features and Implementation
UIViewControllerRepresentableProtocol
Implementing theUIViewControllerRepresentableprotocol allows a UIKitUIViewControllerto be reused within SwiftUI.isScanning: This is a binding to the parent view, controlling the scanning state.didFindBarcode: A callback function that is executed whenever a barcode is successfully scanned and read.
Coordinator and Bridging
makeCoordinator: This method is required to fulfill theUIViewControllerRepresentableprotocol. It creates a “bridge” (e.g., a broker, intermediary, or proxy) between the UIKitUIViewControllerand the SwiftUI environment. In this implementation, the Coordinator class conforms to theAVCaptureMetadataOutputObjectsDelegateprotocol, which handles metadata detection and processing.
Creating the
UIViewControllermakeUIViewController: Another required method in the protocol, responsible for returning a configuredUIViewController.- Inside this method, the
AVCaptureSessionis set up to detect specific barcode formats (e.g.,EAN-13,EAN-8,PDF417, etc.). - The configured session is added as a layer to the
UIViewController.view.
- Inside this method, the
    func updateUIViewController(_ uiViewController: UIViewController, context: Context) {
        // Here we can update the UI if needed (for example, stopping the session)
    }

    //1
    @MainActor
    class Coordinator: NSObject, @preconcurrency AVCaptureMetadataOutputObjectsDelegate {
        var parent: ScannerPreview

        init(parent: ScannerPreview) {
            self.parent = parent
        }
        // 2
        // MARK :- AVCaptureMetadataOutputObjectsDelegate
        func metadataOutput(_ output: AVCaptureMetadataOutput, didOutput metadataObjects: [AVMetadataObject], from connection: AVCaptureConnection) {
            // 4
            if let metadataObject = metadataObjects.first {
                guard let readableObject = metadataObject as? AVMetadataMachineReadableCodeObject else { return }
                guard let stringValue = readableObject.stringValue else { return }
                AudioServicesPlaySystemSound(SystemSoundID(kSystemSoundID_Vibrate))
                self.parent.isScanning = false
                // 3
                parent.didFindBarcode(String(stringValue))
            }
        }
    }
Later, we will implement the Coordinator class, which must inherit from NSObject because it needs to conform to the AVCaptureMetadataOutputObjectsDelegate protocol, an extension of NSObjectProtocol.
Key Features and Implementation:
Swift 6 Compliance and Data Race Avoidance
To ensure compliance with Swift 6 and avoid data races, the class is executed on@MainActor. This is necessary because it interacts with attributes from its parent,UIViewControllerRepresentable. SinceAVCaptureMetadataOutputoperates in a non-isolated domain, we’ve marked the class with@MainActor.Thread Safety
Before markingAVCaptureMetadataOutputObjectsDelegatewith@preconcurrency, ensure the following:- The
metadataOutput.setMetadataObjectsDelegate(context.coordinator, queue: DispatchQueue.main)call is executed on the main thread (@MainActor). - This guarantees that when setting up
AVCaptureMetadataOutput, it operates safely on the main thread.
- The
Data Handling
The parent view receives a copy of the scanned barcode string. At no point does the delegate implementation modify the received data. This ensures thread safety and avoids potential data races.Protocol Method Implementation
In the protocol method implementation:- Fetch the first object.
- Retrieve the barcode value.
- Update the scanning state.
- Execute the callback function.
By ensuring that no data is modified across different isolated domains, it is safe to proceed with marking the protocol with @preconcurrency.
Final step is just implent the SwiftUI view where ScannerPreview view will be embeded. Create a new file called BarcodeScannerView and write following code:
import SwiftUI
import AVFoundation

struct BarcodeScannerView: View {
    @State private var scannedCode: String?
    @State private var isScanning = true
    @State private var showAlert = false

    var body: some View {
        VStack {
            Text("Scan a Barcode")
                .font(.largeTitle)
                .padding()

            ZStack {
                //1
                ScannerPreview(isScanning: $isScanning,
                               didFindBarcode: { value in
                    scannedCode = value
                    showAlert = true
                }).edgesIgnoringSafeArea(.all)

                VStack {
                    Spacer()
                    HStack {
                        Spacer()
                        if let scannedCode = scannedCode {
                            Text("Scanned Code: \(scannedCode)")
                                .font(.title)
                                .foregroundColor(.white)
                                .padding()
                        }
                        Spacer()
                    }
                    Spacer()
                }
            }

            if !isScanning {
                Button("Start Scanning Again") {
                    self.isScanning = true
                    self.scannedCode = nil
                }
                .padding()
                .background(Color.blue)
                .foregroundColor(.white)
                .cornerRadius(8)
            }
        }
        .onAppear {
            self.scannedCode = nil
            self.isScanning = true
        }
    }
}
Key Features and Implementation:
-
Just place the preview in a ZStack and implment the callback to execute when the barcode is read.
import SwiftUI

struct ContentView: View {
    var body: some View {
        BarcodeScannerView()
    }
}

#Preview {
    ContentView()
}
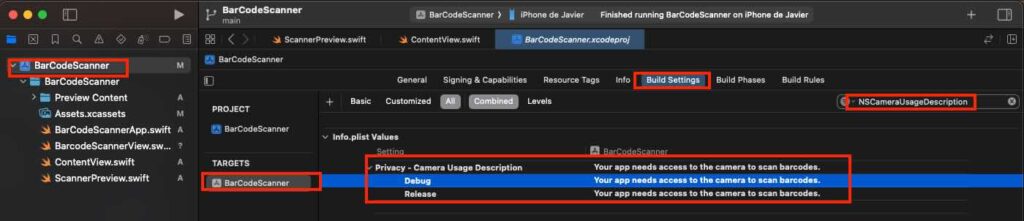
Last but not least be sure that ContentView is executing the view that we have just created. And be sure that you have a description for NSCameraUsageDescription setting.
Build and Run on real device
For executing the app be sure that you deploy on a real device (iPhone or iPad). Whem the app ask you permission for using the camera, obviously say allow.


Conclusions
In this post, you have seen how easy it is to implement a barcode scanner using native libraries. You can find the working code used in this post in the following repository.
References
- Metadata capture
Apple Developer Documentation
- Swift 6 Migration recipess
JaviOS Post